

Hei Mi A1 fans,
What's cooking with your Android One device? This the second volume for my "ifelixit" series. What do say we install TWRP for our beloved device to flash mods or custom ROMs, to discover and get more customization of your choice. Let's have some fun here for the upcoming Lunar New Year holiday season.

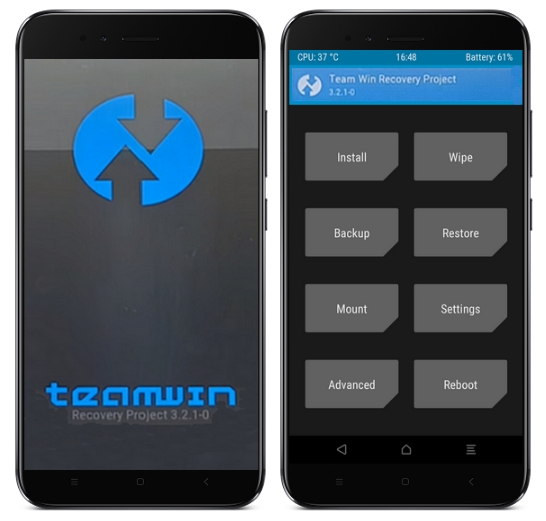
TWRP 3.2.1-0 is out now for Mi A1
What's new in 3.2.1-1:
* minui fixes (cryptomilk)
* Better android-8.0 compatibility in ROM trees (Dees_Troy)
* Fix missing library in android-8.0 (nkk71)
* Fix inconsistent SDCard naming (DevUt)
* Default to TWRP restore instead of adb backup restore to fix restore on fresh TWRP boot (jlask)

Alright, how do we go about doing it. For a quick understanding, as we all know Mi A1 comes with an A/B partition and how it's different. A/B devices have duplicates of many partitions on the device. An A/B device has 2x system partitions, 2x boot partitions, 2x vendor partitions, 2x modem / firmware partitions, etc. Only one slot is in use at a time. During early boot, the first stages of the bootloader read some small amount of data called the BCB or Bootloader Control Block and decide whether to boot the A partitions or the B partitions. When an OTA update is available, the data from the active slot is copied from the inactive slot and patched / updated. For example, if you're currently on slot A, your device would download the update and copy the existing system partition from slot A and patch / update it with the new updates into slot B. Once the copying and updating is complete, the BCB is updated and the device reboots using slot B. Next time an update is available, the system partition in slot B is copied to slot A and updated, the BCB gets updated, and we reboot to slot A.
Since all known A/B devices do not have a separate recovery partition, you will eventually have to flash TWRP to the boot partition. We then use fastboot boot to temporarily boot TWRP without flashing TWRP and afterwards, flash TWRP zip to both slots.

Requirements:
- 1. Download Minimal ADB and Fastboot v1.4.2 and install it on your PC/Laptop, preferably on C\:Drive and choose system-wide installation.
- 2. Make a Working folder for the 3 files you need below.
- 3. Download oreo_3.2.2_recovery.img and make a copy in your "Download folder" on your device.
- 4. Download patched_boot.img (Note: OPR1.170623.026.8.1.10 rom) and make a copy in your "Download folder" on your device.
- 5. Download twrp-3.2.1-1-installer-tissot-FIXED_By_DroiDMester.zip and make a copy in your "Download folder" on your device.
Essentials:
- 1. Updated to Oreo Android Version
- 2. Bootloader Unlocked
- 3. USB DATA cable (the one that came with your device)
- 4. Before proceeding: Disable Driver Signature Enforcement in Windows 7/8/10 64-Bit
- 4. Enable USB Debugging - Goto Developer options > USB Debugging - Enable (If you have not activated Developer options, then Goto Settings > About phone > tap Build number 3 times > You are now a developer)
- 5. Enable OEM unlocking - Goto Developer options > OEM unlocking - Enable
- 6. Battery is charged at least 50%.
Method:
- Switch Off your Mi A1.
- Connect your USB cable to the PC/Laptop.
- Goto the location where you copied the "Working folder".
- Within the folder press the Shift+Right click your mouse, and select "Open command window here"
- Enter the following command to enter fastboot mode, as follows:-
- Or else you can alternatively, Press Power & Volume Down simultanously, to enter Fastboot Mode.
- Enter the following command to "Unlock your bootloader" if it has not been unlocked, as follows:-
12. Once TWRP is flashed, tap Back twice or Home button to return to the TWRP Main Menu, choose and Tap "Reboot", it will bring you to the Reboot menu, you should be on Current Slot:B, if so, tap Slot B to proceed.
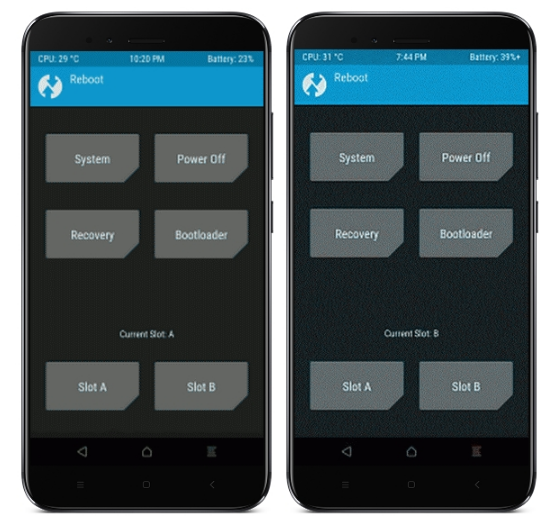

14. Next, on your PC/Lappie type fastboot boot oreo_3.2.2_recovery.img, that will boot into TWRP 3.2.1-0, then select twrp-3.2.1-1-installer-tissot-FIXED_By_DroiDMester.zip and "Swipe to confirm Flash", once it flashed, continue and tap Reboot System button, then Swipe to instal TWRP App.

DISCLAIMER: DO ON YOUR OWN RISK. Flashing can potentially bricked or bootloop your device.
"Solving with simplicity"

Image credit: Google
Wish Those Celebrating A Happy Prosperous Lunar New Year!


No comments:
Post a Comment